Writing C# in Visual Studio Code with linting for Streamer.bot
Description
This tutorial provides a general step-by-step guide on setting up Visual Studio Code (VS Code) for writing C# code for Streamer.bot. By following these instructions, you'll be able to write code with linting, which will help you catch errors early and ensure your code compiles. You still need to copy and paste your code into Streamer.bot's C# compiler.
What is linting?
A lint, or linter is a tool that analyzes your source code to automatically flag programming errors, bugs, stylistic errors, and suspicious constructs. (source)
Pre-requisites
Installation
- Without IntelliSense
- With IntelliSense
Installation
- Install Visual Studio Code
- Launch Visual Studio Code
- Open Extensions
- Keyboard Shortcut:
Ctrl+Shift+X - Menu Bar:
View > Extensions
- Keyboard Shortcut:
- Install the
C#extension
- This will also install the following Extension dependencies:
- .NET Install Tool
This was the original method I hacked together for developing C# for Streamer.bot in VS Code. The non-IntelliSense method is simpler and the de-facto method.
Description
IntelliSense is an AI powered tool you can use to assist with developing in C#.
Additional reading:
- IntelliCode for C# Dev Kit Extension
- VisualStudio Code IntelliSense
- C# IntelliSense on learn.microsoft.com
Pre-requisites
- IntelliCode for C# Dev Kit extension
- Microsoft account
Instructions
-
Launch VS Code
-
Open Extensions
- Keyboard Shortcut:
Ctrl+Shift+X - Menu Bar:
View > Extensions
- Keyboard Shortcut:
-
Install the
IntelliCode for C# Dev Kitextension
-
This will also install the following Extension dependencies:
- C#
- C# Dev Kit
- .NET Install Tool
Sign into Visual Studio Account
- Open Command Palette with
- Keyboard Shortcut:
Ctrl+Shift+P - Menu Bar:
View > Command Palette
- Keyboard Shortcut:
- Type
.NET: Sign into Visual Studio accountand select it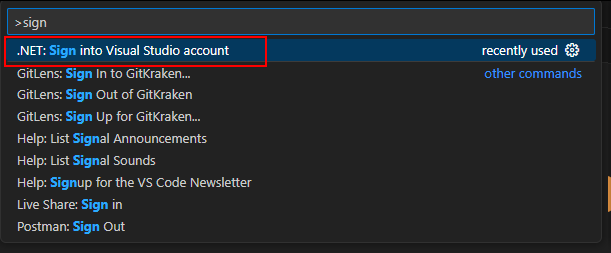
- Select
Allowand it will open your web browser for you to log in with your Microsoft Account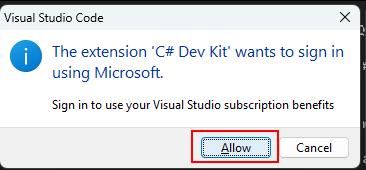
- Proceed to log in with Microsoft Account
Create new .NET Project
-
Command Palette
- Keyboard Shortcut:
Ctrl+Shift+P - Menu Bar:
View > Command Palette
- Keyboard Shortcut:
-
Type
.NET: New Projectand select it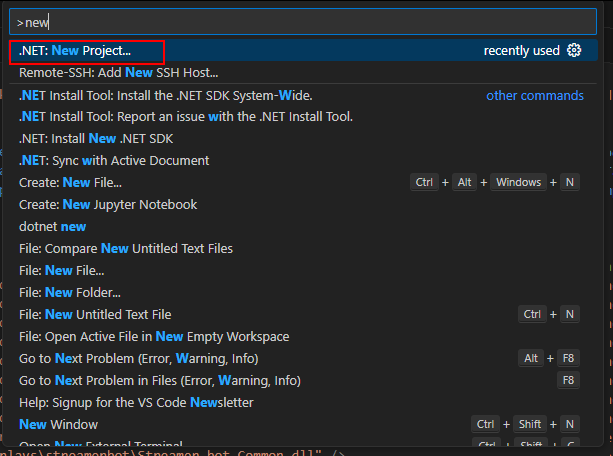
-
Select
Console App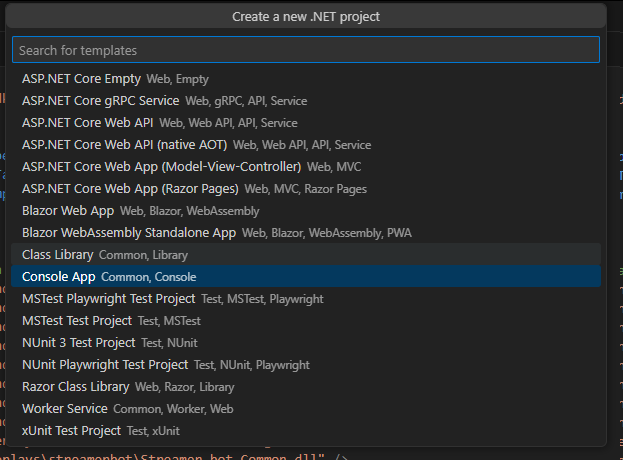
-
Select a folder to save the new project folder into
-
Write a name for the project and hit enter

You can re-use the same project and have unique .cs files for each of your extensions. If you plan on doing this, you can give your project a more generic name.
Please ensure you keep unique names for each public class, otherwise you will see compile warnings. 
-
Press enter or select
Create Project
Configure new project once VS Code is configured
- Open the Explorer
- Keyboard Shortcut:
Ctrl+Shift+E - Menu Bar:
View > Explorer
- Keyboard Shortcut:
- Create a new file with a .csproj filename extension
- If you used the IntelliSense instructions, the .csproj file may already exist, so open that instead
- Replace with this template in the code block below
- Save and close the
.csprojfile
- Windows
- Linux
- Cross-Platform
<Project Sdk="Microsoft.NET.Sdk">
   <PropertyGroup>
      <TargetFramework>net481</TargetFramework>
      <LangVersion>13.0</LangVersion>
      <Nullable>enable</Nullable>
      <UseWPF>true</UseWPF>
      <DefineConstants>DEBUG;NOT_STREAMERBOT</DefineConstants>
      <NoWarn>CS0114</NoWarn>
      <!-- Fill in the path to your Streamer.bot folder here -->
      <StreamerBotPath>D:\overlays\streamerbot\</StreamerBotPath>
      <DotNetPath>C:\Windows\Microsoft.NET\Framework64\v4.0.30319\</DotNetPath>
   </PropertyGroup>
   <ItemGroup>
      <!-- Include all DLLs in a specific directory in the build output -->
      <Reference Include="$(DotNetPath)mscorlib.dll" />
      <Reference Include="$(DotNetPath)netstandard.dll" />
      <Reference Include="$(DotNetPath)System.dll" />
      <Reference Include="$(DotNetPath)System.Core.dll" />
      <Reference Include="$(DotNetPath)System.Net.dll" />
      <Reference Include="$(DotNetPath)System.Net.Http.dll" />
      <Reference Include="$(DotNetPath)System.Drawing.dll" />
      <Reference Include="$(DotNetPath)System.Windows.Forms.dll" />
      <!-- Use forward slashes for cross-platform compatibility -->
      <Reference Include="$(StreamerBotPath)Streamer.bot.Plugin.Interface.dll" />
      <Reference Include="$(StreamerBotPath)Streamer.bot.Common.dll" />
      <Reference Include="$(StreamerBotPath)Twitch.Common.dll" />
      <Reference Include="$(StreamerBotPath)NAudio*.dll" />
      <Reference Include="$(StreamerBotPath)Wpf*.dll" />
      <Reference Include="$(StreamerBotPath)Newtonsoft.Json.dll" />
      <!-- Uncomment to reference all dlls in the streamerbot directory -->
      <!-- <Reference Include="$(StreamerBotPath)**/*.dll" /> -->
   </ItemGroup>
</Project>
<Project Sdk="Microsoft.NET.Sdk">
   <PropertyGroup>
      <TargetFramework>net481</TargetFramework>
      <LangVersion>13.0</LangVersion>
      <Nullable>enable</Nullable>
      <UseWPF>true</UseWPF>
      <DefineConstants>DEBUG;NOT_STREAMERBOT</DefineConstants>
      <NoWarn>CS0114</NoWarn>
      <!-- Fill in the path to your Streamer.bot folder here -->
      <StreamerBotPath>/home/user/overlays/streamerbot/</StreamerBotPath>
      <DotNetPath>$(StreamerBotPath)/pfx/drive_c/windows/Microsoft.NET/Framework64/v4.0.30319/</DotNetPath>
   </PropertyGroup>
   <ItemGroup>
      <!-- Include all DLLs in a specific directory in the build output -->
      <Reference Include="$(DotNetPath)mscorlib.dll" />
      <Reference Include="$(DotNetPath)netstandard.dll" />
      <Reference Include="$(DotNetPath)System.dll" />
      <Reference Include="$(DotNetPath)System.Core.dll" />
      <Reference Include="$(DotNetPath)System.Net.dll" />
      <Reference Include="$(DotNetPath)System.Net.Http.dll" />
      <Reference Include="$(DotNetPath)System.Drawing.dll" />
      <Reference Include="$(DotNetPath)System.Windows.Forms.dll" />
      <!-- Use forward slashes for cross-platform compatibility -->
      <Reference Include="$(StreamerBotPath)Streamer.bot.Plugin.Interface.dll" />
      <Reference Include="$(StreamerBotPath)Streamer.bot.Common.dll" />
      <Reference Include="$(StreamerBotPath)Twitch.Common.dll" />
      <Reference Include="$(StreamerBotPath)NAudio*.dll" />
      <Reference Include="$(StreamerBotPath)Wpf*.dll" />
      <Reference Include="$(StreamerBotPath)Newtonsoft.Json.dll" />
      <!-- Uncomment to reference all dlls in the streamerbot directory -->
      <!-- <Reference Include="$(StreamerBotPath)**/*.dll" /> -->
   </ItemGroup>
</Project>
<Project Sdk="Microsoft.NET.Sdk">
   <PropertyGroup>
      <TargetFramework>net481</TargetFramework>
      <LangVersion>13.0</LangVersion>
      <Nullable>enable</Nullable>
      <UseWPF>true</UseWPF>
      <DefineConstants>DEBUG;NOT_STREAMERBOT</DefineConstants>
      <NoWarn>CS0114</NoWarn>
      <!-- Windows Path -->
      <StreamerBotPath>D:\overlays\streamerbot</StreamerBotPath>
      <DotNetPath>C:\Windows\Microsoft.NET\Framework64\v4.0.30319</DotNetPath>
      <!-- Linux Path -->
      <StreamerBotPathLinux>/home/rondhi/.local/lib/streamer.bot</StreamerBotPathLinux>
      <DotNetPathLinux>$(StreamerBotPathLinux)/pfx/drive_c/windows/Microsoft.NET/Framework64/v4.0.30319/</DotNetPathLinux>

   </PropertyGroup>
   <!-- <ItemGroup> -->
   <ItemGroup Condition="'$(OS)' == 'Windows_NT'">
      <!-- Include all DLLs in a specific directory in the build output -->
      <Reference Include="$(DotNetPath)\mscorlib.dll" />
      <Reference Include="$(DotNetPath)\netstandard.dll" />
      <Reference Include="$(DotNetPath)\System.dll" />
      <Reference Include="$(DotNetPath)\System.Core.dll" />
      <Reference Include="$(DotNetPath)\System.Net.dll" />
      <Reference Include="$(DotNetPath)\System.Net.Http.dll" />
      <Reference Include="$(DotNetPath)\System.Drawing.dll" />
      <Reference Include="$(DotNetPath)\System.Windows.Forms.dll" />
      <!-- Use forward slashes for cross-platform compatibility -->
      <Reference Include="$(StreamerBotPath)\Streamer.bot.Plugin.Interface.dll" />
      <Reference Include="$(StreamerBotPath)\Streamer.bot.Common.dll" />
      <Reference Include="$(StreamerBotPath)\Twitch.Common.dll" />
      <Reference Include="$(StreamerBotPath)\NAudio*.dll" />
      <Reference Include="$(StreamerBotPath)\Wpf*.dll" />
      <Reference Include="$(StreamerBotPath)\Newtonsoft.Json.dll" />
      <!-- Uncomment to reference all dlls in the streamerbot directory -->
      <!-- <Reference Include="$(StreamerBotPath)**/*.dll" /> -->
   </ItemGroup>
   <ItemGroup Condition="'$(OS)' != 'Windows_NT'">
      <!-- Include all DLLs in a specific directory in the build output -->
      <Reference Include="$(DotNetPathLinux)/mscorlib.dll" />
      <Reference Include="$(DotNetPathLinux)/netstandard.dll" />
      <Reference Include="$(DotNetPathLinux)/System.dll" />
      <Reference Include="$(DotNetPathLinux)/System.Core.dll" />
      <Reference Include="$(DotNetPathLinux)/System.Net.dll" />
      <Reference Include="$(DotNetPathLinux)/System.Net.Http.dll" />
      <Reference Include="$(DotNetPathLinux)/System.Drawing.dll" />
      <Reference Include="$(DotNetPathLinux)/System.Windows.Forms.dll" />
      <!-- Use forward slashes for cross-platform compatibility -->
      <Reference Include="$(StreamerBotPathLinux)/Streamer.bot.Plugin.Interface.dll" />
      <Reference Include="$(StreamerBotPathLinux)/Streamer.bot.Common.dll" />
      <Reference Include="$(StreamerBotPathLinux)/Twitch.Common.dll" />
      <Reference Include="$(StreamerBotPathLinux)/NAudio*.dll" />
      <Reference Include="$(StreamerBotPathLinux)/Wpf*.dll" />
      <Reference Include="$(StreamerBotPathLinux)/Newtonsoft.Json.dll" />
      <!-- Uncomment to reference all dlls in the streamerbot directory -->
      <!-- <Reference Include="$(StreamerBotPathLinux)**/*.dll" /> -->
   </ItemGroup>
</Project>
- The .csproj file configures the project as a .NET Framework 4.8.1 project
- Streamer.bot v0.2.8 and earlier targetted .NET Framework 4.7.2
- I've added some basic assembly references that are used frequently
- You will need to add more per your requirements
- To point to your own Streamer.bot dlls, replace the directory with your own Streamer.bot directory and Streamer.bot
dllsdirectory
Template for the .cs file
- Open the Explorer
- Keyboard Shortcut:
Ctrl+Shift+E - Menu Bar:
View > Explorer
- Keyboard Shortcut:
- Create a new
.csfile and use the following as a template
// Place your namespaces here
using System;

// Do not edit anything other than UniqueClassName //
// which should match your file name               //
#if NOT_STREAMERBOT                                //
using Streamer.bot.Plugin.Interface;               //
using Streamer.bot.Plugin.Interface.Model;         //
using Streamer.bot.Plugin.Interface.Enums;         //
using Streamer.bot.Common.Events;                  //
public class UniqueClassName : CPHInlineBase
#else                                              //
public class CPHInline                             //
#endif                                             //
//-------------------------------------------------//
{
    public bool Execute()
    {
        // your main code goes here
        return true;
    }
}
- This is similar to the default code found in the
Execute C# Codesubaction - If you have multiple .cs files in the same project, just make sure that you change
UniqueClassNameto any unique string, otherwise you will see compile warnings - The DefineConstants in the .csproj file sets
NOT_STREAMERBOT, which how the compiler can detect whether to use the UniqueClassName with the CPHInlineBase inheritor. If pasted into Streamer.bot, then Streamer.bot doesn't have that set, so it uses CPHInline
CPH methods will now auto-fill
-
You can type
CPH.and it will automatically give you the available CPH methods- This uses the
Streamer.bot.Plugin.Interface.dllof your Streamer.bot folder - The advantage of this is that you will have a current list of methods available based on which version of Streamer.bot you're running.
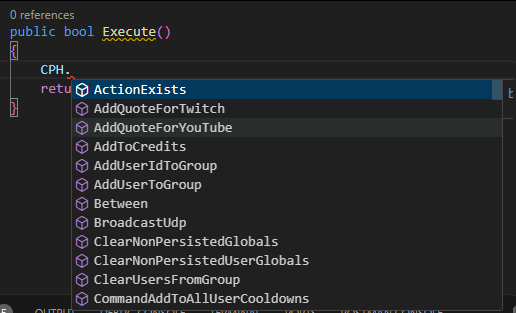
- This uses the
-
Open
Problems- Keyboard Shortcut:
Ctrl+Shift+M - Menu bar:
View > Problems
- Keyboard Shortcut:
-
The
Problemsview will show you if there will be any compile errors- Look for any red error icons
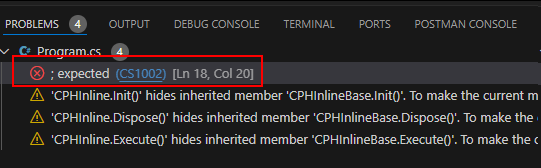
- Compiler errors will show with a red ⭕ and need to be remedied
- Warnings will be shown with a yellow triangle, however, code will still compile in Streamer.bot
Copying code to Streamer.bot
- All you need to do now is copy and paste the code into an Execute C# sub-action in Streamer.bot. You do not need to edit any of the code after pasting.
- Make sure the code compiles successfully by clicking
Compile - Finally, click
Save and Compile